I had been trying to monetize my blog with AdSense for a while, and somehow, every time I was not approved.
I was on the verge of losing hope in blogging. I was hesitant to try other ad companies…
You know, AdSense is so popular and every blogger wants to be in. And somehow we forget other ad companies exist.
I did thorough research and checked up on reviews of other ad companies. Two companies seemed popular: Adsterra and Ezoic.
And I had to choose between the two. Finally, I decided to settle on Adsterra, even though I still had some doubts about it. But its reviews were super compared to Ezoic.
Plus, Ezoic couldn’t connect with Blogger blogs. I have both WordPress and Blogger blogs. It’s been months monetizing with Adsterra and all has been great.
And that’s why I would love to recommend it and guide you on how to connect your website with Adsterra.
In this article, you’re going to learn how to:
1. Sign up on Adsterra as a Publisher
2. Add your Website
3. Pick suitable Ad Units
4. Get Ad Codes
5. Put Ad Codes on your website
Sounds great? Keep reading!
5 Steps To Monetize Your Blog With Adsterra
Here are simple steps to monetize your WordPress or Blogger blog with Adsterra.
1. Sign Up on Adsterra as a Publisher
The first step is to register with Adsterra. What you do is search for Adsterra.com or click on this link.
Then click on “Sign up”. A pop-up will appear and urge you to sign up as an advertiser or Publisher. Click on “Sign up as a Publisher”.
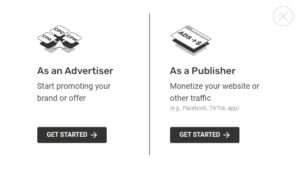
Your next step is to fill out these fields and then check your email to pass the second step of authorization. After you verify your email, you can log in as a Publisher.
2. Add Your Website URL
On your publisher’s dashboard, you will see the “Add Website” button on your top left. Once you click “ADD WEBSITE”, a new window pops up.
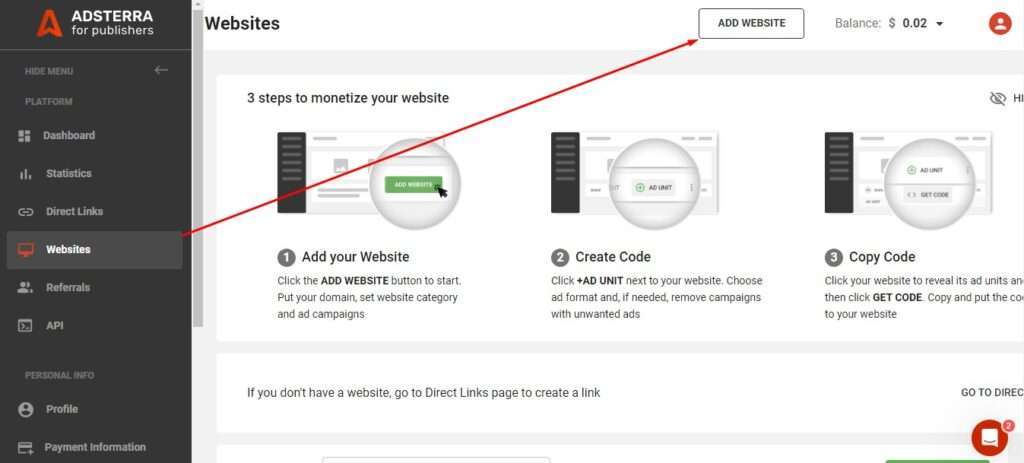
Please examine all the fields attentively and fill them out one by one:
- Add your website URL.
- Choose your website category from the list. The category is the niche of your site or its main purpose.
- If nothing suits, please pick “Other”.
3. Pick Suitable Ad Units
There are many ad units you can choose from. Available ad units are types of ad codes you want to appear on web pages.
You can choose either:
- Popunder ads
- Social Bar
- Native Banners
- Display banners.
Select one ad unit (each time you can add just one code: Popunder, Social Bar, Native Banner, or Banner, etc.).
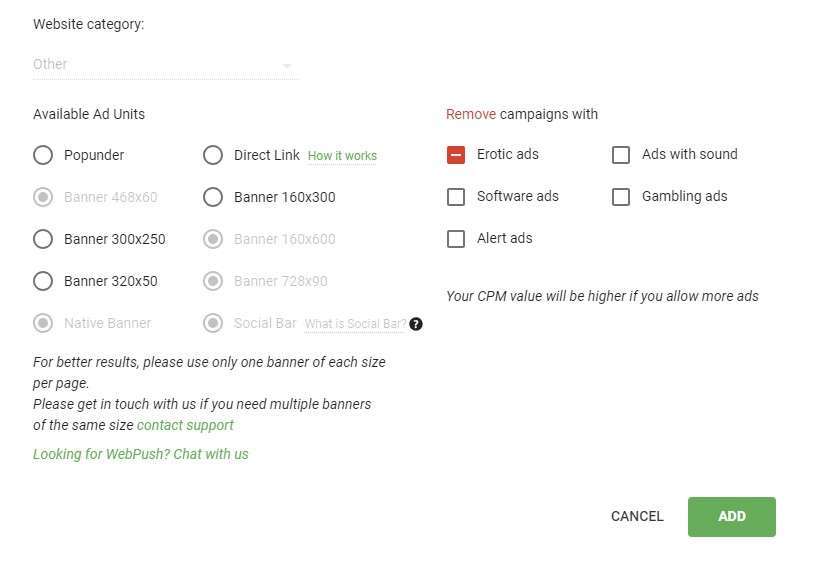
Each ad has a specific code. You can also put filters to remove ads that you don’t want to run (like those with sound). Click the big “ADD” button.
4. Get Ad Code
After you add a website, you’ll see its status. It’ll be in Pending status for a couple of minutes. Approved sites are green.
Wait until the Pending status changes to Approved. Once you see the site’s status change to Approved, click “All codes” > “Get code”.
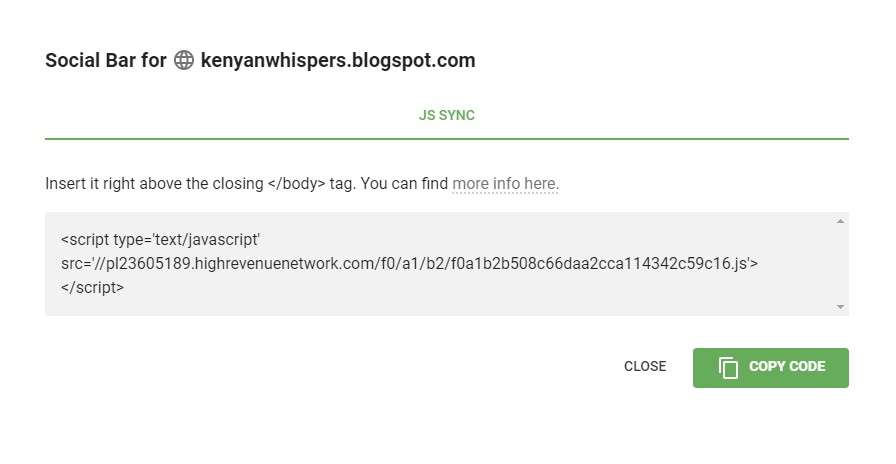
Depending on the ad unit/ad format you picked previously, Adsterra will generate a unique script for your website.
Mind reading the instructions, as they help you place the code correctly.
For example, here’s an ad code for Social bar with its unique instruction:
You May Also Like:
How to Start a Blog and Make Money in 2024
7 Best Web Hosting Companies in Kenya & Africa
How to Create an Online Course and Start Earning
5. Put the Ad Codes on Your Website
Ok, you have successfully generated your ad code/script. Let’s see how and where you can place it on your WordPress website or Blogger website to monetize from ads.
We’ll go step by step to make each action clearer.
How to Put Ads on WordPress Website
There are three ways to place Adsterra ads on WordPress:
Put Ads on All Pages (Best for Popunder and Social Bar)
Popunders and Social Bar ads are special because they don’t consume any space on a web page’s layout; you don’t have to reserve a fixed block for them.
Using the WordPress Theme Editor:
- Log in to your WordPress admin panel (https://[yoursite.com]/wp-admin).
- Find the Appearance section (on the left) and click on it. Choose Editor or Theme Editor.
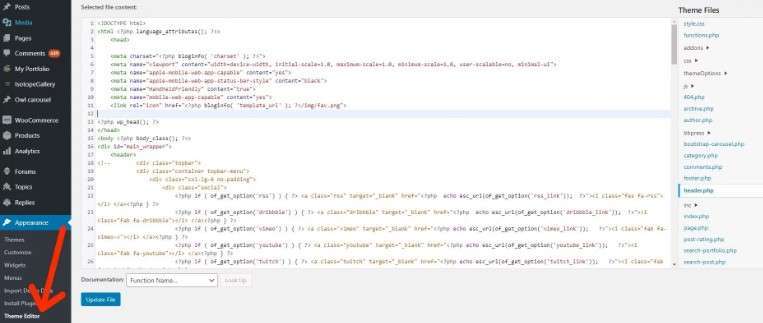
- Find the theme’s header.php file.
- Copy your Adsterra code:
- For Popunder: paste the code before the closing </head> tag.
- For Social Bar: paste the code before the closing </body> tag.
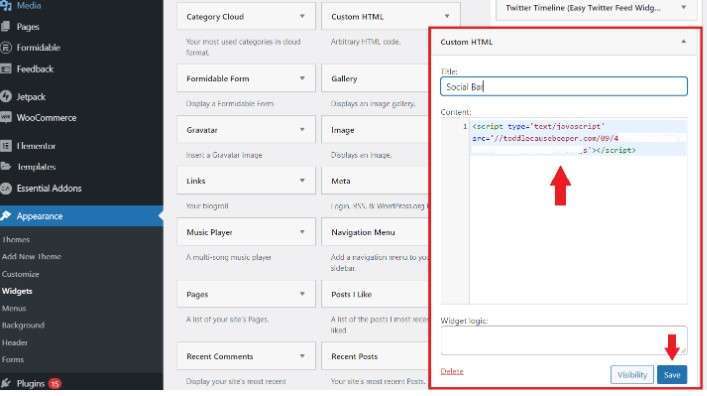
- Click Update file or Save, depending on your WP version.
Using the WordPress Widgets Section:
- Log in to your WordPress admin panel.
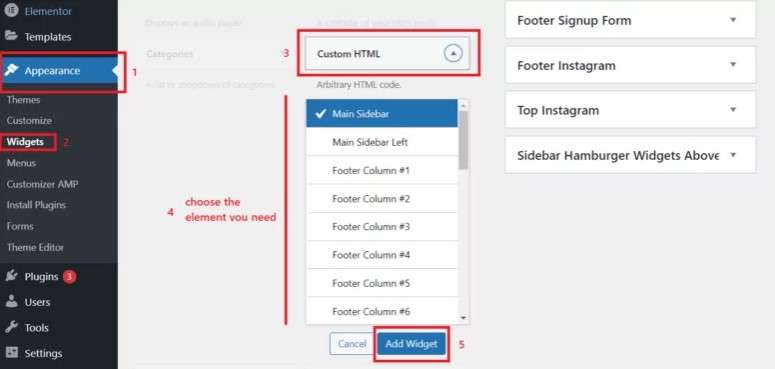
- Find the Appearance section and choose the Widgets tab.
- Select Custom HTML from the list.
- Check the theme element (e.g., Sidebar) and click Add Widget; the widget will open in the element section.
- Paste Adsterra Popunder or Social Bar code in the Content field. Make sure you have copied the whole piece of code.
- After you paste the code in the widget, click Save. You’re ready to monetize your WordPress website with Popunder or Social Bar ads!
Put Ads on Selected Pages (Display or Native Banners)
On the Adsterra platform, take the same steps you did for getting a Popunder or Social Bar ad code.
On WordPress, place the codes exactly where you want the banners to appear on your page.
You can place the ad codes with Custom HTML widgets as we did earlier.
How to Put Ads on a Blogger Website
There are two ways of adding ads to monetize a Blogger-based website or blog.
Placing Ads via Blogspot Themes
When you need advertising units to appear on every page, use your website theme settings.
After you log in, on your left-hand menu, find and hit the Layout tab. You see how the skeleton of your website looks like, all of its blocks like header, footer, sidebars, etc.
Click the Add a gadget section and choose HTML/JavaScript from the list.
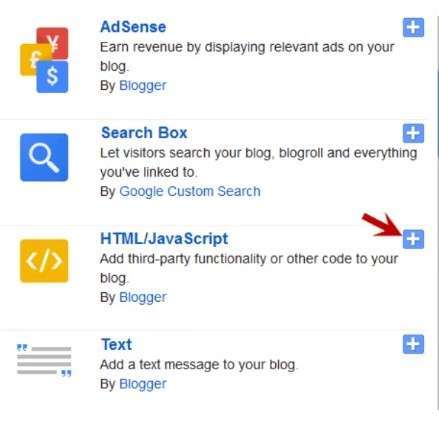
Paste the code you generated at Adsterra into the Content field and click Save.
After you add a gadget, you will see your new HTML/JavaScript element inside the website layout.
Drag and drop your gadget if you want to place native or display banner somewhere else, like the website header or sidebar.
Placing Ads on a Separate Blog Post Page
Sometimes you need to put ads on specific web pages, avoiding all the rest. This might be helpful if you want to test a new format or leave some pages free of advertising.
Open the post where you want to show ads. Switch to HTML view by clicking the icon on the upper left corner.
Paste the code snippet that you copied from your Adsterra account. Make sure you place the code according to Adsterra instructions.
Pro Tips to Monetize Your Site with Adsterra
Now that we have gone over the steps that a WordPress website owner needs to take to monetize their website, let’s highlight some helpful tips.
1. Start with fewer ad formats: One or two will be enough. With fewer ads, it’ll be easier to monitor how effective your ads are and how your audience reacts to them.
2. Place banners on the most visible spots: But make sure they don’t overlap the content or navigation buttons.
3. Copy and paste ad codes: One typo and the code won’t work.
One code for one ad unit: To place two ad units (e.g., two 160×300 banners) on the same page, you’ll need to generate two codes. Don’t put the same code twice.
4. Advanced settings: Some ad units have advanced settings available on request. For instance, you can ask your Adsterra manager to change the frequency of ads, which means how many advertising offers one user will see within a given time. Learn how this setting might affect your CPM.
5. Check your settings twice: Ensure all settings are correct.
6. Combine ad codes with different behavior: For example, Popunders will appear outside a website, so they don’t consume your layout’s space. Combine this unit with a Banner or Social Bar.
Finally…
Finally, we’ve come to the end. I really hope this simple guide will help you effectively monetize your blog with Adsterra.
Remember, it’s all about testing and finding what works best for your audience and site.
Happy blogging!


Completely I share your opinion. In it something is also idea good, agree with you.