Are you planning to set up your online course with LearnDash LMS?
I have prepared a detailed guide to help you set up a course on LearnDash and start earning.
In this guide, you will find these steps:
- Set Up Your WordPress Website
- Install the LearnDash Plugin
- Install a LearnDash-Compatible Theme
- Configure Basic Kadence Theme Settings
- Create Your First Course in LearnDash
- Install Elementor and Design Core Pages
- Create a Course Page with Course Grid Plugin
- Create Your Login and Registration Page
- Create Custom Navigation Menus for Guests and Students
- Set Up WooCommerce to Accept Payments and Add Products
- Create a Checkout Page or Funnel with CartFlows
- Install Must-Have WordPress Plugins for Key Functionality
Sounds great? Let’s get started!
13 Steps to Create Your Online Course with LearnDash
In this section, I’ll explain how you can create your online course with Learndash. Keep reading!
1. Set Up Your WordPress Website
Before diving into LearnDash, you need to set up your basic WordPress site. Here’s how you can do it:
- Purchase Web Hosting and a Domain Name: Choose a reliable web hosting service and a unique domain name.
- Install WordPress: Get WordPress installed on your hosting account.
I recommend using Namecheap for hosting.
They offer excellent security, top performance, and fantastic customer support. Their servers are optimized for WordPress, ensuring fast speeds.
Plus, they provide easy WordPress installation, auto-updates, and a handy WordPress Starter tool to get you up and running quickly.
Namecheap offers three plans:
- Stellar Plan: $4.48/month – Suitable for up to 3 websites with 20 GB SSD storage and up to 30 mailboxes.
- Stellar Plus Plan: $6.48/month – Ideal for unlimited websites with unmetered SSD storage and unlimited mailboxes.
- Stellar Business Plan: $9.48/month – Perfect for businesses with unlimited websites and 50 GB SSD storage.
Namecheap will guide you through the installation process, making it simple to get started. If you need detailed help, refer to our article on how to make a WordPress website in a day.
2. Install the LearnDash Plugin
With your WordPress site ready, you can now install the LearnDash plugin. Here’s how to do it:
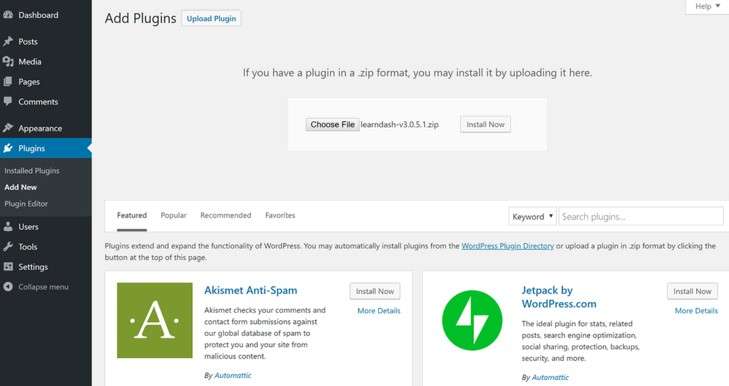
- Access your WordPress dashboard by going to yoursite.com/wp-admin.
- Navigate to Plugins → Add New.
- Click Upload Plugin and select the zip file you downloaded from your LearnDash account.
- Install and activate the plugin.

If you haven’t purchased LearnDash yet, visit their website to make your purchase. After buying, download the plugin from your LearnDash account page and follow the steps above to install it on your site.
3. Install a LearnDash-Compatible Theme
To ensure your course content looks professional and engaging, you’ll need a LearnDash-compatible theme.
The Kadence theme is an excellent choice because it offers a high level of customization and a dedicated LearnDash integration.
- Go to Appearance → Themes → Add New in your WordPress dashboard.
- Search for “Kadence” and install the theme.
The Kadence theme comes with a free version that provides core features, but you can unlock more options and deeper integration with LearnDash by purchasing Kadence Pro.
4. Configure Basic Kadence Theme Settings
Once the Kadence theme is installed, you have two options for configuring your site’s appearance:
Import a Demo Site
Kadence offers a library of importable demo sites. These pre-built designs can save you time and provide a professional look right away. There’s even a dedicated LearnDash Academy starter site that you can import for free.
To import a demo site:
- Install the Starter Templates plugin.
- Go to Appearance → Starter Templates and choose a design to import.
Customize Manually
If you prefer, you can customize your site from scratch.
- Go to Appearance → Customize to launch the WordPress Customizer.
Here, you can adjust various settings such as colors, typography, headers, and footers. Changes are displayed in real-time, making it easy to see how your site will look.
Spend some time exploring the Customizer options to make your site uniquely yours. Focus on settings that impact the overall look and feel, especially colors, fonts, and the layout of your headers and footers.
5. Create Your First Course in LearnDash
Now that your site’s basic design is set up, you can start creating your first course with LearnDash.
Follow these steps:
- Go to LearnDash LMS → Courses in your WordPress dashboard.
- Click the Add Your First Course button.
- Provide a name and description for your course.
- Use the Builder tab to add sections, lessons, and quizzes.
To add content to a lesson, hover over it and click the Edit link. This will open a new page where you can enter your lesson content and configure various settings.
In the course settings, navigate to the Settings tab to adjust additional options. Set the Access Mode to Closed for now, as you’ll configure your payment gateway later.
6. Install Elementor and Design Core Pages
Your site needs more than just course pages. Design your home, about, and contact pages using the Elementor plugin, a visual drag-and-drop page builder.
- Go to Plugins → Add New and search for “Elementor”.
- Install and activate the plugin.
- Create a new page and click Edit with Elementor.
Elementor’s interface is intuitive. You can drag and drop elements to build your pages and see changes in real-time.
Design the core pages of your site, including:
- Home: Welcome visitors and provide an overview of your courses.
- About: Share your story and mission.
- Contact: Provide ways for visitors to get in touch with you.
You don’t need to worry about checkout and course pages at this point. We’ll address those with other plugins later.
7. Create a Course Page with Course Grid Plugin
If you plan to offer multiple courses, you’ll need a dedicated course page to display all your offerings.
Use the free LearnDash Course Grid add-on for this:
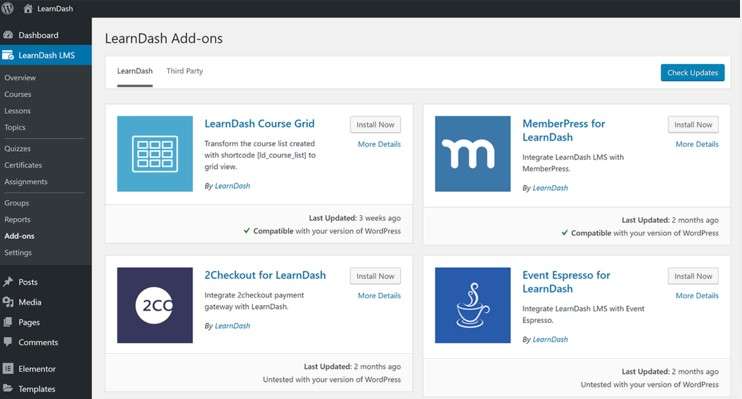
- Go to LearnDash LMS → Add-ons in your WordPress dashboard.
- Install and activate the LearnDash Course Grid add-on.

You can then use a shortcode or a Gutenberg block to display your courses on a dedicated page.
8. Create Your Login and Registration Page
To provide a seamless experience for your students, create a custom login and registration page. The default WordPress pages are functional but not user-friendly.
Use LearnDash’s built-in login/registration features, which are automatically added to your course pages.
Alternatively, use a plugin like Theme My Login for more customization options.
Add the [learndash_login] shortcode to a new page to create a custom login page.
9. Create Custom Navigation Menus for Guests and Students
Different users need different navigation options. Use the free Nav Menu Roles plugin to create custom menus:
- Go to Appearance → Menus.
- Install and activate the Nav Menu Roles plugin.
- Customize who can see each menu item using the new Display Mode options:
- Select Logged Out Users for anonymous visitors.
- Select Logged In Users for students.
This way, you can ensure that students have easy access to important course-related pages.
10. Set Up WooCommerce to Accept Payments and Add Products
For flexible and optimized payment options, integrate LearnDash with WooCommerce:
Install the free WooCommerce plugin from WordPress.org.
Configure WooCommerce by following the setup wizard, which will guide you through essential settings and payment gateways.
- Go to WooCommerce → Settings → Accounts & Privacy:
- Disable the option to place an order without an account.
- Enable the option to log in during checkout.
- Enable account creation during checkout.
Install the free LearnDash WooCommerce integration add-on from LearnDash LMS → Add-ons.
To sell your courses, create WooCommerce products:
- Go to Products → Add New.
- Use the Product data box to specify that you want to sell a course.
- Use the Related Courses picker to link the product to the appropriate course(s).
Repeat this process for all the courses you want to sell.
To create a unified experience, you can also integrate the LearnDash profile with WooCommerce by combining the [ld_profile] shortcode with the [woocommerce_my_account] shortcode on a single page.
11. Create a Checkout Page or Funnel with CartFlows
CartFlows allows you to create conversion-friendly checkout pages and sales funnels:
- Install and activate the CartFlows plugin.
- Go to CartFlows in your WordPress dashboard and run the setup wizard.
- Select your page builder (Elementor) and configure basic settings.
- Go to CartFlows → Add New to create your first flow (checkout page/funnel).
- Choose a template or start from scratch. Use Elementor to design your checkout page and configure the funnel options and steps.
12. Install Must-Have WordPress Plugins for Key Functionality
To enhance your site’s functionality and security, install essential plugins:
- HubSpot: Adds marketing tools like forms, live chat, email marketing, and analytics.
- UpdraftPlus: Automates backups to keep your course and student data secure.
- Wordfence: Provides robust security to protect your site from malicious attacks.
- Yoast SEO: Helps improve your site’s visibility in search engines.
13. Improve and Iterate
Creating your online course with LearnDash LMS doesn’t stop at the launch.
Continuously improve your course based on student feedback, monitor site performance, and update content regularly to keep it fresh and engaging.
Final Thoughts
That’s it.
By following these detailed steps, you’ll have a fully functional, professional online course website using LearnDash LMS.
This comprehensive approach ensures that your site not only looks great but also provides an excellent user experience for your students.
Good luck with your online teaching journey!

Read Also:
How to Build a WordPress Website in One Day
How to Start a Nail Parlour Business in Kenya


